Published August 27, 2014 05:05PM
Rocky Mountain Photography - All-Star Scenery by Erik Stensland
Four seasons of views in Rocky Mountain National Park
'Erik Stensland'
Spring, summer, fall, and winter, the park brims with one-of-a-kind photographic opportunities. Capture stunning memories with this guide to pro-quality pics all year long.
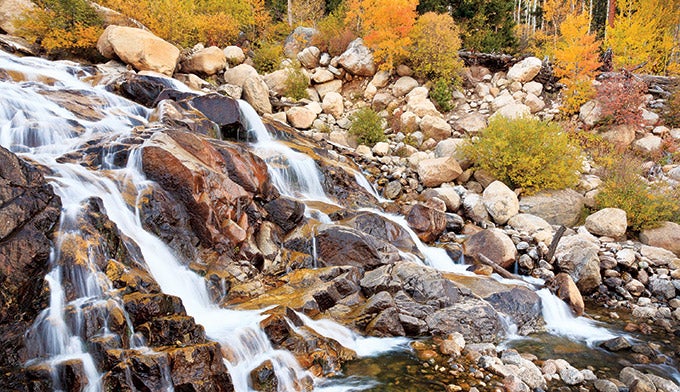
Go with the Flow
Alluvial Fan

The cascade shown here was created by a massive 1982 flood that redistributed boulders and debris; last fall, another enormous flood rebuilt the Alluvial Fan once again, creating a brand-new course for the Roaring River.
Pro tip Use a slower shutter speed to create a sense of motion when shooting water; add a tripod to hold your camera steady. Try several speeds to see which you like best.
Shot details Canon 5D Mark ii camera, 24mm lens, ISO 100, f/13, 1/3 second
ADVERTISEMENT
Starry Night
An unnamed tarn below Andrews Peak

Pro tip To capture crisp stars, you’ll need a wide-open
aperture and high ISO.
Shot details Nikon D800e camera, 14mm lens, ISO 6400, f/2.8, 30 seconds
A River Runs Through It
Beaver Meadows

The park’s ivory-barked aspen trees are most famous for their golden autumn hues, but their delicate springtime leaves provide an equally lovely sight. A grove of aspens looks like a group of individual trees, but it’s actually a single organism—the trunks all spring from one underground root system. (A 106-acre aspen grove in Utah called Pando is one of the world’s largest organisms.) Look for the trees growing along streams and in subalpine zones from 6,000 to 10,000 feet.
ADVERTISEMENT
Pro tip Winding streams are perfect subjects because they draw the viewer’s eyes into the frame. Create a more dynamic feel by placing the stream in a bottom corner and having it move diagonally through the scene, pulling the eye deep into the landscape.
Shot details Canon Rebel XT camera, 33mm lens, ISO 100, f/22,
2.5 seconds
When to Use a Tripod
A tripod helps ensure crisp images in low light. Rule of thumb: Use a tripod when your shutter speed is lower than 1/60 of a second, or when the shutter speed is slower than the focal length. Invest in the lightest tripod you can afford (and that can support your camera with its heaviest lens). Even point-and-shoot users can benefit from a small tripod, like the flexible GorillaPod models (joby.com).
Field of Dreams
Moraine Park

About 1,000 elk call Rocky Mountain home. Look for this year’s newborn calves bedded down with their mothers in open valleys in late May through early June.
Pro tip Placing the horizon in the middle of the shot can make for a boring composition. Instead, decide if you want the viewer to pay more attention to the sky or the ground, then include more of that one in the frame.
ADVERTISEMENT
Shot details Canon 5Dii camera, 40 mm lens, ISO 100, f/16, 1.6 seconds
Blooming Good Time
Bluebird Lake

Elephant head, paintbrush, and aster light up at Bluebird Lake. See them via the 6-mile (one-way) hike from Wild Basin trailhead.
Pro tip Everyone loves seeing alpine wildflowers in bloom, but their fleeting nature makes photographing them tricky. Know when to expect the show: Flowers in the park’s lower elevations typically peak the second or third week of June, and higher elevations are best the third week of July.
Shot details Canon 5D Mark ii camera, 17mm lens, ISO 100, f/13, 1/20 second
ADVERTISEMENT
Filter It
Graduated neutral density filters that are half-dark and half-transparent are helpful when the sky you are photographing is significantly brighter than the land. To expose both land and sky properly, put the dark half over the sky and the transparent half of the filter over the terrain.
Dawn Patrol
Outlet of Bluebird Lake

The rising sun turns the small stream flowing from Bluebird Lake an arresting shade of rosy peach. Sunrise photos are easier (and more fun) when you sleep over; nab the Upper Ouzel Creek backcountry site to skip the 6-mile hike to the lake in the dark.
ADVERTISEMENT
Pro tip Don’t forget to look behind you! It can be easy to become so engrossed in your intended scene, like Bluebird Lake, that you miss other shots. Sometimes the best scenes are found where we least expect them. Look in all directions to see how light is interacting with the land and clouds around you.
Shot details Canon 5D Mark ii camera, 50mm lens, ISO 100, f/13, 0.8 seconds
Flying High
Rainbow Curve on Trail Ridge Road

Low clouds create an otherworldly vista from this pullout on Trail Ridge Road (12 miles from Beaver Meadows).
Pro tip Check the weather report and use the webcams (nps.gov/romo/photosmultimedia/webcams.htm) to assess conditions. It’s often possible to drive above the clouds.
Shot details Canon 5D Mark ii camera, 40mm lens, ISO 100, f/22, 1/10 second
ADVERTISEMENT
Powder Blue
Dream Lake

Snowshoe or ski 1.1 miles from Bear Lake to capture the winter snowscape surrounding 9,900-foot Dream Lake.
Pro tip When snowstorms come right after warmer weather, the snow clings to everything to create a winter wonderland. Don’t wait to get out and shoot—strong winds often blow the snow away in a matter of hours.
Shot details Canon 5D Mark ii camera, 24mm lens, ISO 100, f/13, 1/4 second